Rendering 1 Million spheres: Part 4 (Frustum Culling & Level of Detail)
In this blog, we will go through the 2 most important and standard optimizations methods including Frustum Culling and Level of Detail.
Frustum Culling
Frustum culling is an optimization technique that can improve the rendering performance by excluding the objects outside the camera’s viewing frustum from the rendering pipeline. The camera’s viewing frustum depends on the type of camera we are using. As we are using a perspective camera, frustum should also be of perspective type. But there is one issue that when the camera moves, spheres are dynamically removed or included during the movement, which can result in a bad visual experience.
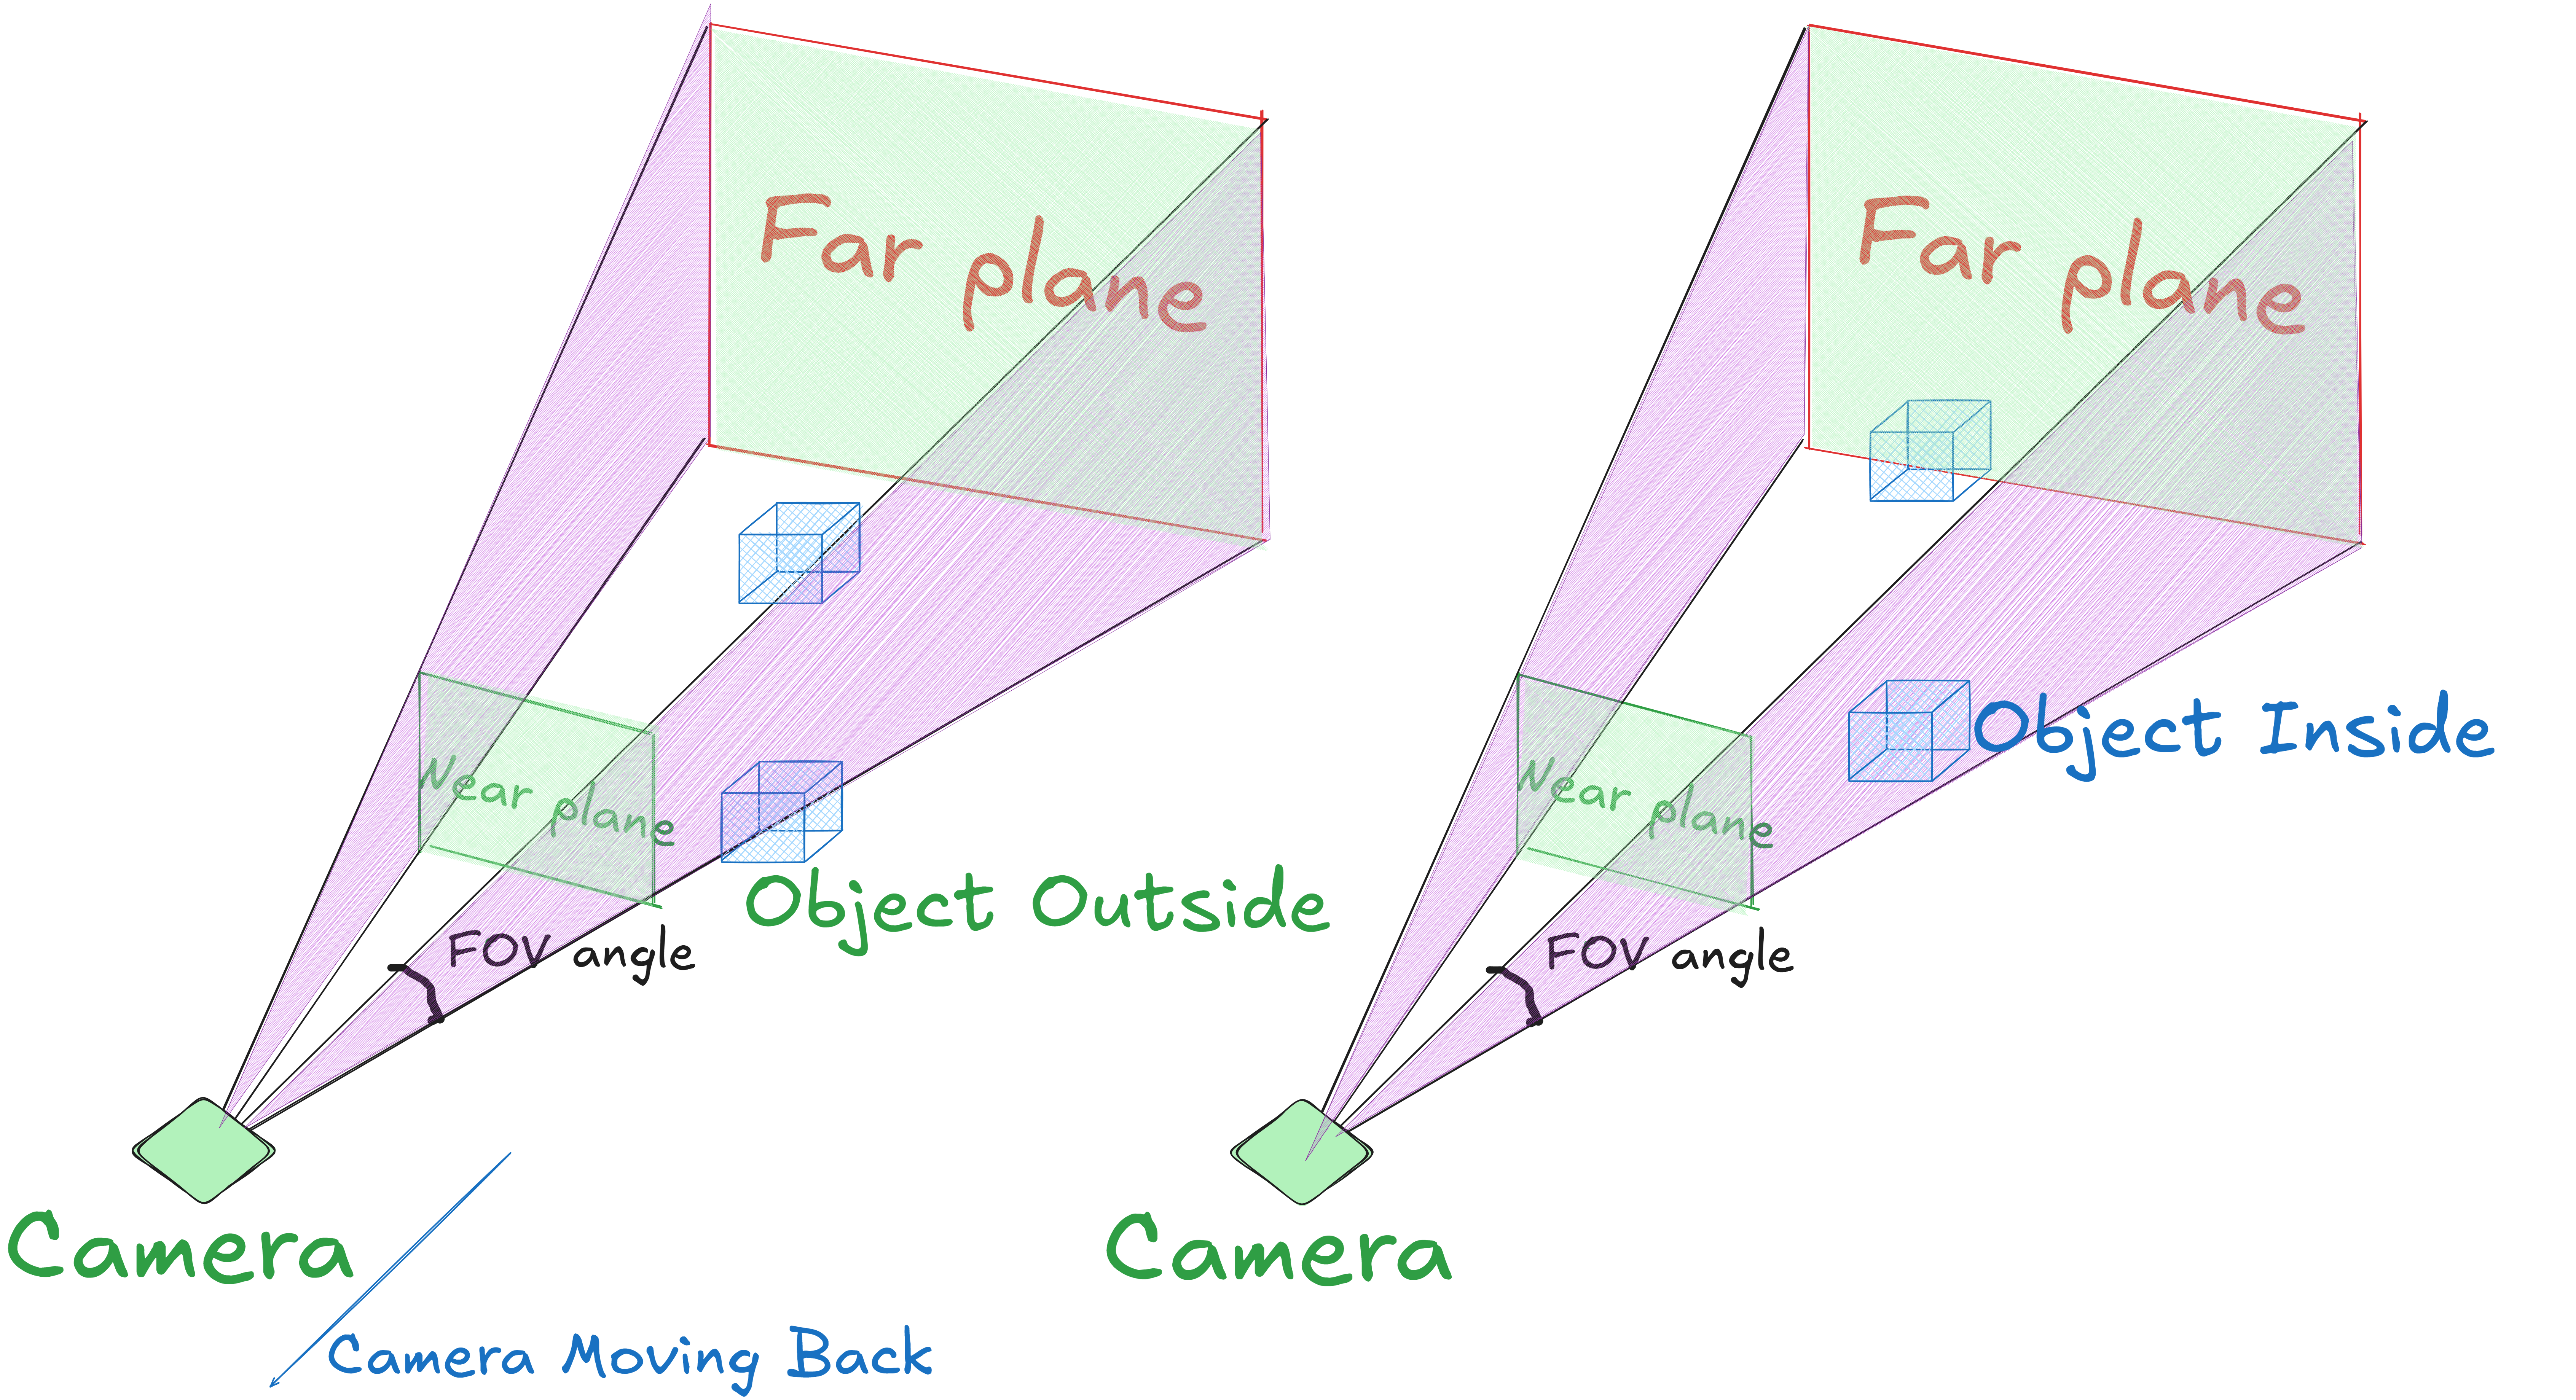
It’ll look good if these spheres will get added and removed at the near and far plane only, which will produce a much better visual experience. We can produce this effect using an orthographic-type frustum while using a perspective camera.
Orthographic Frustum
Before performing frustum culling, we need to calculate the positions of the frustum planes. As we already have defined the near and far plane distance for camera, our frustum depth will be (far - near).
We can define frustum Width and depth based on our scene. The minimum value we should assign for the frustum depth is 150.0f because our spheres are spread from -150 to +150 along the z-axis. For frustum width too, we should assign it at least 150.0f. We will calculate frustum height using the aspect ratio we have defined for our screen.
void Camera::UpdateFrustum() {
	float frustumWidth = 180.0f;
	float frustumHeight = 9.0f / 16.0f * frustumWidth;
	float frustumDepth = 200.0f;

	this->left	  = Position.x - frustumWidth / 2.0f;
	this->right	  = Position.x + frustumWidth / 2.0f;

	this->bottom  = Position.y - frustumHeight / 2.0f;
	this->top	  = Position.y + frustumHeight / 2.0f;

	this->near	  = Position.z;
	this->far	  = Position.z - frustumDepth;
}
We will call updateFrustum() inside updateMatrix() after calculating the cameraMatrix in our rendering loop.
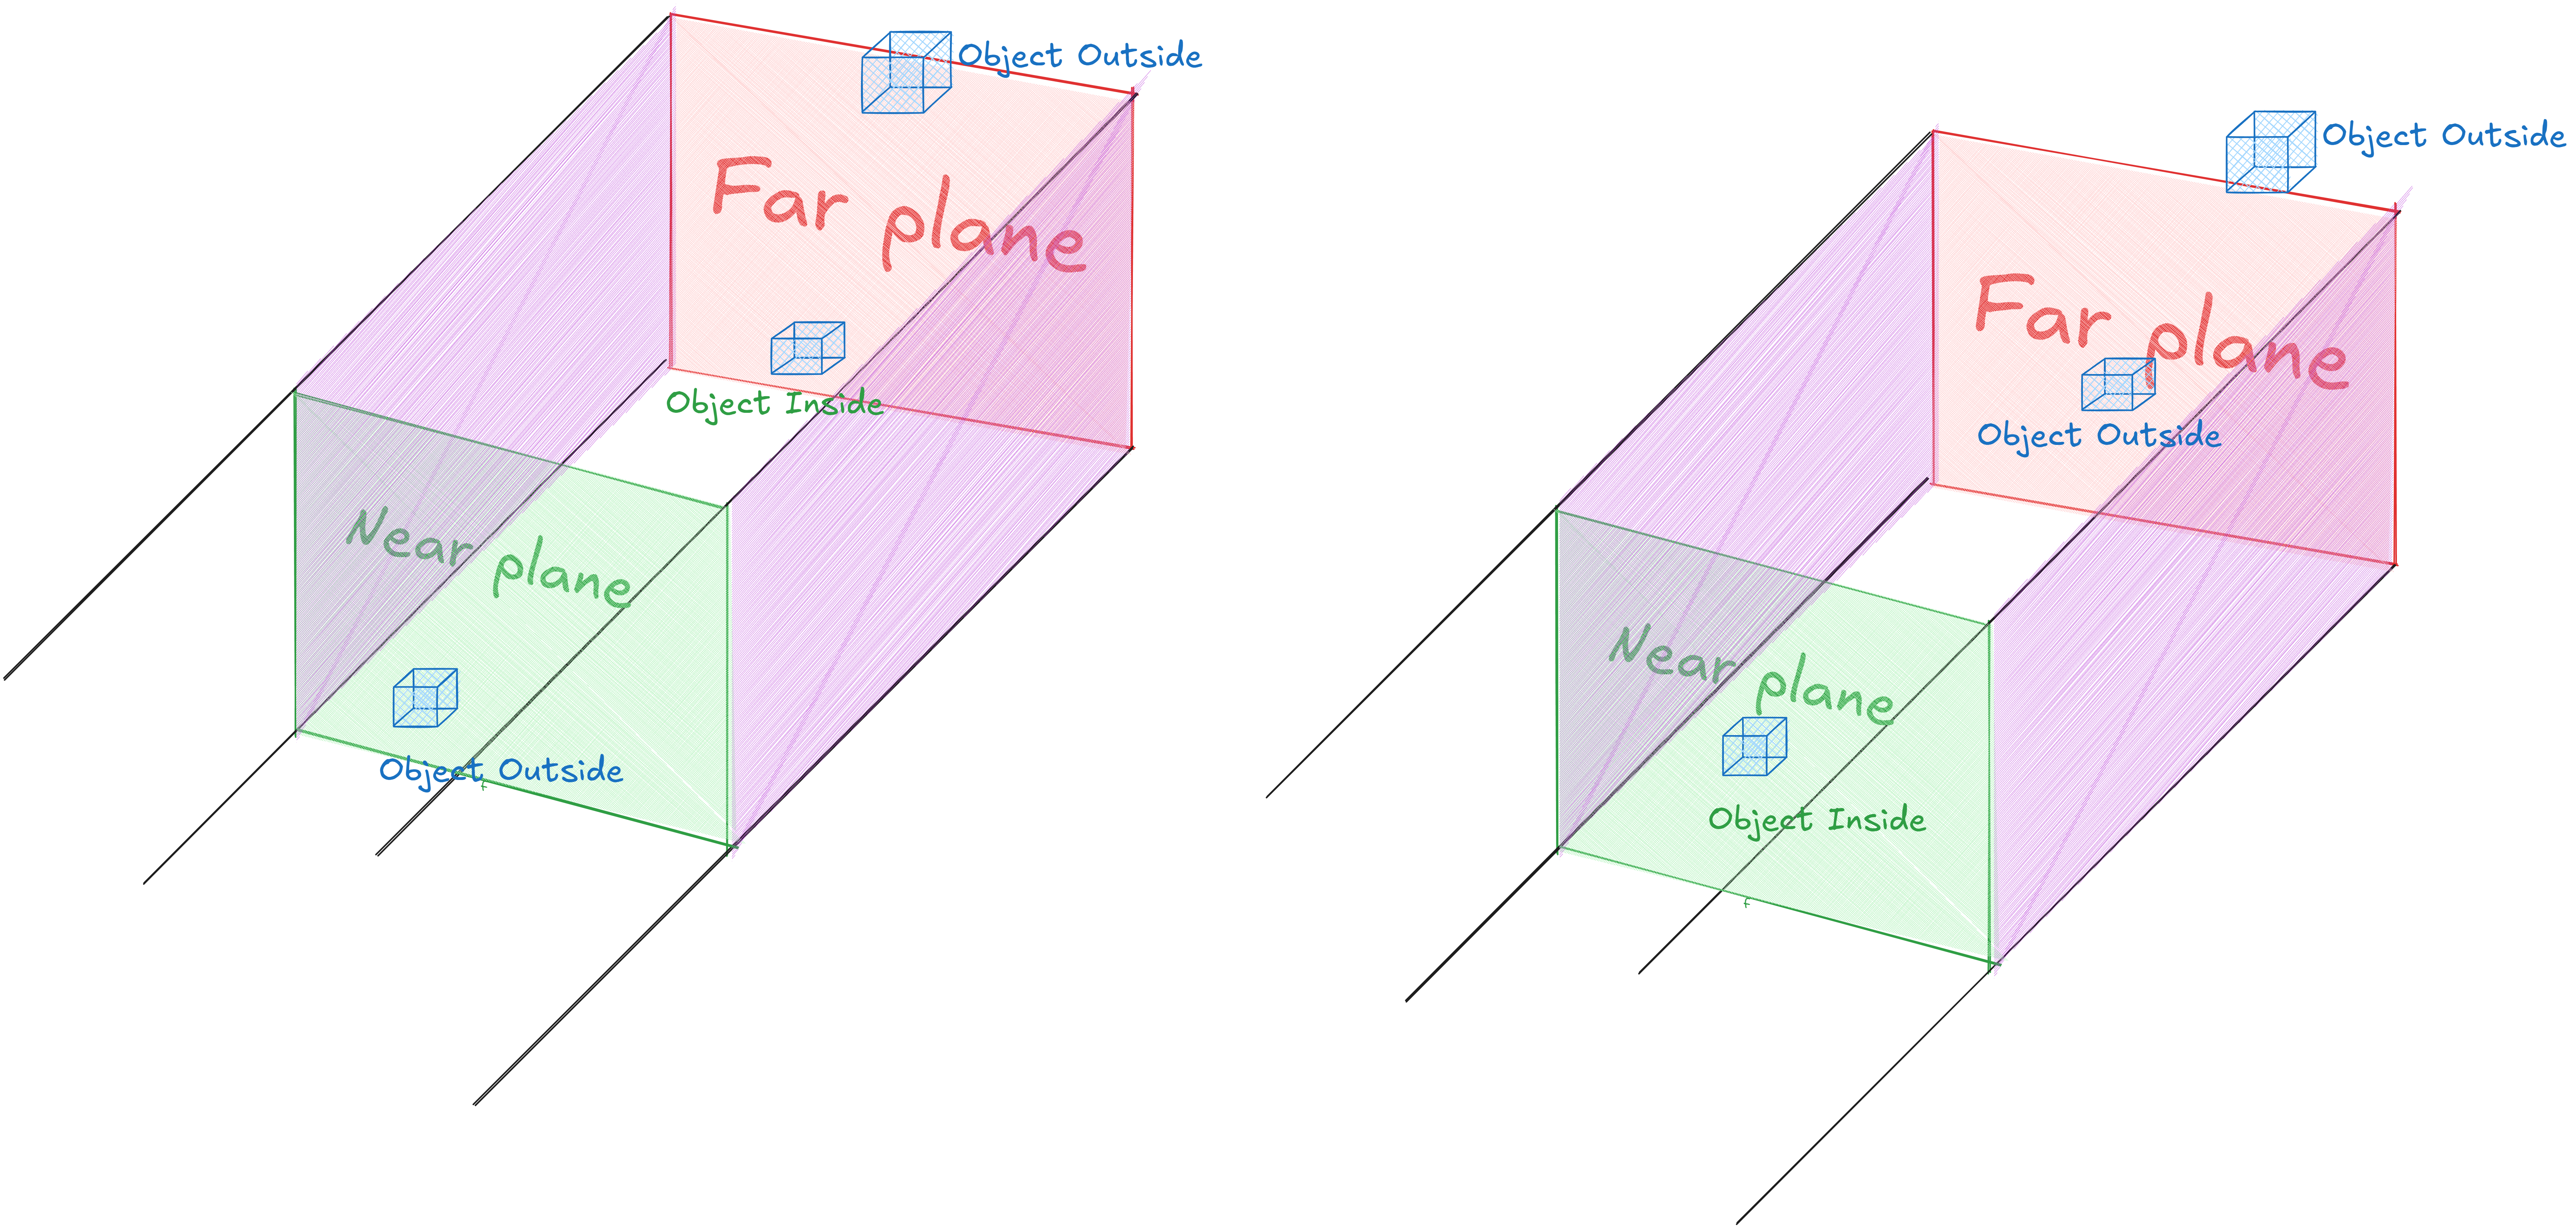
After this we need to check if a sphere is lying inside or outside our frustum. For this, we will just check that our sphere’s center as a point is inside all 6 frustum planes or not.
static bool isInside(const glm::vec3& position, Camera& camera) {
    return position.x >= camera.left && position.x <= camera.right &&
        position.y >= camera.bottom && position.y <= camera.top &&
        position.z <= camera.near && position.z >= camera.far;
}
We will also need one separate funtion which will call isInside() for all instancePositions and if inside, it will push to culledPositions vector. So, we will use this culledPositions.size() instead of numInstances.
void Mesh::doCulling(Camera& camera){
	for (size_t i = 0; i < instancePositions.size(); i++){
		if (isInside(instancePositions[i], camera)) {
			culledPositions.push_back(instancePositions[i]);
		}
	}
}
...
void Mesh::Draw(...){
	...
	glDrawElementsInstanced(GL_TRIANGLES, indices.size(), GL_UNSIGNED_INT, 0, culledPositions.size());
}
Then we will call this doCulling() function before calling the baseSphere.Draw(shaderProgram, camera, numInstances) inside our rendering loop.
Now, try to increase the numInstances value, start from at least 100k where screen is rendering with 60 fps. For me till 175k spheres, it’s rendering with ~60fps
Level of Detail (LOD)
Level of Detail is a technique used to optimize rendering performance by dynamically adjusting the complexity of 3D models based on their distance from the camera. The closer an object is to the viewer, the higher the detail of the model, and vice versa.
In our application, we can implement this by dividing the frustum depth into three parts based on the distance from the camera. The first part, nearest to the camera, will contain spheres with the highest vertex count, the middle section will have spheres with a medium vertex count, and the last part will include spheres with the lowest vertex count. Implementing LOD improves performance by reducing computations on the GPU (fewer vertices to process in the vertex and fragment shaders). We will generate vertices in three separate vectors for LOD and their corresponding indices in the same manner. Within the Mesh class, a new constructor will be required to assign three distinct VAOs for LOD.
// main.cpp
std::vector<glm::vec3> highDetailVertices;
std::vector<GLuint> highDetailIndices;

std::vector<glm::vec3> mediumDetailVertices;
std::vector<GLuint> mediumDetailIndices;

std::vector<glm::vec3> lowDetailVertices;
std::vector<GLuint> lowDetailIndices;

// change the segments value based on your system specs, for me the graphic quality was good with following segment values
const int highDetailLatSegments = 30;
const int highDetailLonSegments = 30;

const int mediumDetailLatSegments = 25;
const int mediumDetailLonSegments = 25;

const int lowDetailLatSegments = 8; // we can drop it to 8 because they will look very small on the screen and don't need much detailing
const int lowDetailLonSegments = 8;

for (int i = 0; i <= highDetailLatSegments; ++i) {
	float theta = i * 3.14159265359f / highDetailLatSegments;
	for (int j = 0; j <= highDetailLonSegments; ++j) {
		float phi = j * 2.0f * 3.14159265359f / highDetailLonSegments;

		float x = (radius)*sin(theta) * cos(phi);
		float y = (radius)*sin(theta) * sin(phi);
		float z = (radius)*cos(theta);

		highDetailVertices.push_back(glm::vec3(x, y, z));
	}
}
for (int i = 0; i < highDetailLatSegments; ++i) {
	for (int j = 0; j < highDetailLonSegments; ++j) {
		unsigned int first = (i * (highDetailLonSegments + 1)) + j;
		unsigned int second = first + highDetailLonSegments + 1;

		highDetailIndices.push_back(first);
		highDetailIndices.push_back(second);
		highDetailIndices.push_back(first + 1);

		highDetailIndices.push_back(second);
		highDetailIndices.push_back(second + 1);
		highDetailIndices.push_back(first + 1);
	}
}
...
// Similary do for the mediumDetailVertices and lowDetailVertices
...
Mesh baseSphere(highDetailVertices, highDetailIndices, mediumDetailVertices, mediumDetailIndices,
	lowDetailVertices, lowDetailIndices, instancePositions);
Mesh::Mesh(std::vector<glm::vec3>& highVertices, std::vector<GLuint>& highIndices,
    std::vector<glm::vec3>& medVertices, std::vector<GLuint>& medIndices,
    std::vector<glm::vec3>& lowVertices, std::vector<GLuint>& lowIndices,
    std::vector<glm::vec3>& instancePositions)
{
	...
	highDetailVAO.Bind();
	VBO highVBO(highVertices);
	EBO highEBO(highIndices);
	highDetailVAO.LinkAttrib(highVBO, 0, 3, GL_FLOAT, sizeof(glm::vec3), (void*)(0));
	highDetailVAO.Unbind();
	highVBO.Unbind();
	highVBO.Unbind();

	...
	// repeat for medium and low LOD
	...
}
We’ll also need 3 different instancePositions vector based on the LOD, which we will update after calculating the culledPositions value. For now, we have divided our frustum depth (which is 150 units) in 3 parts (50 units for each LOD).
for (size_t i = 0; i < culledPositions.size(); i++) {
	float distance = glm::length(camera.Position - culledPositions[i]);

	if (distance < 50.0f) {
		highDetailInstancePositions.push_back(culledPositions[i]);
	}
	else if (distance < 100.0f) {
		mediumDetailInstancePositions.push_back(culledPositions[i]);
	}
	else {
		lowDetailInstancePositions.push_back(culledPositions[i]);
	}
}
To draw the spheres now, we need different LOD instance positions, which can be passed through separate draw calls. Since we only have three LODs, using three draw calls instead of one will not significantly impact the rendering performance
Inside our Draw function, we will create three instance VBOs for three different LODs and call glDrawElementsInstanced with the size of the current LOD instance positions.
void Mesh::Draw(...){
	...
	if (!highDetailInstancePositions.empty()) {
		highDetailVAO.Bind();
		InstanceVBO highPosVBO(highDetailInstancePositions);
		highDetailVAO.LinkAttrib(highPosVBO, 1, 3, GL_FLOAT, sizeof(glm::vec3), (void*)(0));

		glDrawElementsInstanced(GL_TRIANGLES, highDetailIndices.size(), GL_UNSIGNED_INT, 0, highDetailInstancePositions.size());

		highPosVBO.Unbind();
		highPosVBO.Delete();
	}

	if (!mediumDetailInstancePositions.empty()) {
		mediumDetailVAO.Bind();
		InstanceVBO medPosVBO(mediumDetailInstancePositions);
		mediumDetailVAO.LinkAttrib(medPosVBO, 1, 3, GL_FLOAT, sizeof(glm::vec3), (void*)(0));

		glDrawElementsInstanced(GL_TRIANGLES, mediumDetailIndices.size(), GL_UNSIGNED_INT, 0, mediumDetailInstancePositions.size());
		medPosVBO.Unbind();
		medPosVBO.Delete();
	}

	if (!lowDetailInstancePositions.empty()) {
		lowDetailVAO.Bind();
		InstanceVBO lowPosVBO(lowDetailInstancePositions);
		lowDetailVAO.LinkAttrib(lowPosVBO, 1, 3, GL_FLOAT, sizeof(glm::vec3), (void*)(0));

		glDrawElementsInstanced(GL_TRIANGLES, lowDetailIndices.size(), GL_UNSIGNED_INT, 0, lowDetailInstancePositions.size());
		lowPosVBO.Unbind();
		lowPosVBO.Delete();
	}
}
Now try to increase the numInstances value and check the screen refresh rate. For me till 200k, I got approximately 60 fps.
Instance VBOs restructuring
There is one more simple optimization we can do where instead of creating an Instance VBO with each draw call, we can create it once using initializeInstanceVBOs(), which we will call just before entering the rendring loop and then just update these Instance VBOs during each draw call.
// In Mesh.h
InstanceVBO *highPosVBO, *medPosVBO...;

// In Mesh.cpp
void Mesh::initializeInstanceVBOs(Camera &camera) {
    for (int i = 0; i < instancePositions.size(); ++i) {
        // Perform frustum culling
        if (isInside(instancePositions[i], camera)) {
            float distanceSquared = glm::distance2(camera.Position, instancePositions[i]);

            // LOD selection based on distance
            if (distanceSquared < 2500.0f) { // High detail
                highDetailInstancePositions.push_back(instancePositions[i]);
            }
            else if (distanceSquared < 10000.0f) { // Medium detail
                mediumDetailInstancePositions.push_back(instancePositions[i]);
            }
            else { // Low detail
                lowDetailInstancePositions.push_back(instancePositions[i]);
            }
        }
    }
    highPosVBO = new InstanceVBO(highDetailInstancePositions);
    medPosVBO = new InstanceVBO(mediumDetailInstancePositions);
    ...
}
// Inside Mesh::Draw() function
void Mesh::Draw(){
	...
	if (!highDetailInstancePositions.empty()) {
		highDetailVAO.Bind();
		highPosVBO->Update(highDetailInstancePositions);

		highDetailVAO.LinkAttrib(*highPosVBO, 1, 3, GL_FLOAT, sizeof(glm::vec3), (void*)(0));

		glDrawElementsInstanced(GL_TRIANGLES, highDetailIndices.size(), GL_UNSIGNED_INT, 0, highDetailInstancePositions.size());
	}
	...
}
We also need to add one Update function in our InstanceVBO class.
// Inside InstanceVBO.cpp
void InstanceVBO::Update(std::vector<glm::vec3>& instanceProps)
{
	glBindBuffer(GL_ARRAY_BUFFER, ID);
	glBufferSubData(GL_ARRAY_BUFFER, 0, instanceProps.size() * sizeof(glm::vec3), instanceProps.data());
}
Now, as you may have observed, we have combined frustum culling and LOD selection into a single loop, which has provided some performance improvement because we removed the culledPosition.push_back(pos), which helped in saving some processing time.
Up to this point, I achieved 250k to 260k spheres rendering smoothly at 60 fps.
Parallel threads calculations
The next approach we can directly implement is to use threads and do these calculations parallely. While it may sound straightforward, implementing thread-based calculations is more complex than it seems. One of the major challenges is thread synchronization, which can become a significant performance bottleneck when using threads. Synchronization introduces overhead, which can significantly impact performance and it increases with the number of threads. After a point, adding more threads does not improve performance and may even degrade it due to the increased complexity of coordination.
To address this, we need to limit the number of threads which can run parallely and optimize our performance. After experimenting with various thread counts, I found that using four threads provided optimal performance. Using higher or lower thread counts led to degraded performance, either due to underutilization or increased synchronization overhead.
I used “
void updateCullingLOD(Camera& camera){
	omp_set_num_threads(4); // thread count 4 gave best results to me
#pragma omp parallel
    {
        // Private thread-local buffers
        std::vector<glm::vec3> threadHighDetailPositions, threadMediumDetailPositions, threadLowDetailPositions;

#pragma omp for schedule(static)
        for (int i = 0; i < instancePositions.size(); ++i) {
			if (isInside(instancePositions[i], camera)) {
				// LOD selection implementation
				// insert in threadHighDetailPositions...
			}
		}
#pragma omp critical
		{
			highDetailInstancePositions.insert(highDetailInstancePositions.end(), threadHighDetailPositions.begin(), threadHighDetailPositions.end());
			...
		}
	}
}
Again, we did not achieve the expected level of performance, only an additional 50k spheres. At this point, I achieved 60 fps with approximately 300k spheres.
Now I understood the main bottleneck on the CPU side was the updateCullingLOD() function which involved performing one million calculations and handling numerous push_back() operations in a single execution. Although it was executed in parallel using four threads, it resulted in minimal performance improvement. So, we had to reduce this number for a single call.
Chunk-Based Calculations (Not Perfect, but Visually Indistinguishable)
I attempted chunk-based calculations by dividing the data into n (<=10) chunks. In each rendering loop, the updateCullingLOD() function will process n-hundred thousand (>=100k) instances and the starting position of loop will offset during each iteration. After completing all chunk calculations, the main vectors will be updated: highInstancePositions, medInstancePositions and lowInstancePositions. It can be implemented by defining the start and end points in the for-loop, maintaining separate staging vectors, and aggregating them once all chunk calculations are completed.
// In Mesh.h
const size_t numChunks = 10; // we will try to reduce it
size_t currentChunk = 0;
size_t chunkSize = 1;

// In Mesh.cpp
Mesh::Mesh(...){
	...
	chunkSize = instancePositions.size() / numChunks;
	...
}
void Mesh::UpdateChunkLODs(Camera& camera){
	size_t start = currentChunk * chunkSize;
	size_t end = std::min(start + chunkSize, instancePositions.size());
	...
	for (int i = start; i < end; ++i) {
		// Perform frustum culling
		if (isInside(instancePositions[i], camera)) {
			...
		}
	}
	highDetailStagingPositions.insert(highDetailStagingPositions.end(), threadHighDetailPositions.begin(), threadHighDetailPositions.end());
    ...
	currentChunk = (currentChunk + 1) % numChunks;

	// Aggregate staging buffers into main buffers after all chunks processing
	if (currentChunk == 0) {
		this->AggregateBuffers();
	}
}
void Mesh::AggregateBuffers()
{
    highDetailInstancePositions = std::move(highDetailStagingPositions);
    mediumDetailInstancePositions = std::move(mediumDetailStagingPositions);
    ...

    // Clean staging buffers for the next cycle
    highDetailStagingPositions.resize(0);
    mediumDetailStagingPositions.resize(0);
    ...
}
Here, we achieved 60 fps for 1,000,000 spheres and I reduced numChunks to 5, and it still maintained the same performance. So, here we are processing 200k spheres in a go and after every five cycles, we update our data, which produces excellent visual results and it is virtually unnoticeable that you are viewing slightly outdated data for mere fractions of a second.
Although this approach does not produce incorrect visual output, still we have to fix it. After doing further research, I found that culling and LOD selection calculations can be performed on the GPU which can provide a significant performance boost, as GPUs are equipped with thousands of cores optimized for parallel processing. GPUs also have higher memory bandwidth, allowing data to be stored directly on the GPU and processed much faster.
In the next blog, I will detail the implementation of culling and LOD selection on the GPU”.